|
 Deutsche Version dieser Seite Deutsche Version dieser Seite |
|
|
|
Ok, so you want to refurbish your Apple Newton 2000 / 2100 battery pack. You are definitely a brave and courageous person. This pack is the most difficult to refurbish of all Newton and eMate packs,
but dont worry: It can be done.
Of course it can never hurt to do a full backup before you start this procedure. An excellent backup tool is the Newton Backup Utility (NBU) for Mac or the Newton Backup Utility (NBU) for PC.
|
|
|
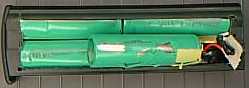
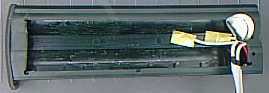
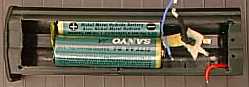
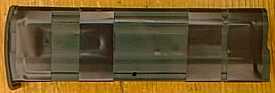
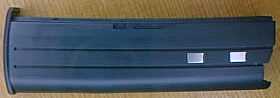 Shown here, slightly distorted because the following pictures were taken
through a magnifying glass, is the MP2K battery pack while it is still in one piece. I hadn´t seen one before, neither from the outside nor from the inside.
I contemplated opening it along the line where the two halves of the case were glued (or more likely fused) together, but decided against it as I had
the impression that it would be very difficult to re-glue them in a way that would ensure the pack will remain in one piece over time. Instead, I decided on cutting a lid on one side. That way the
basic structure of the pack would remain intact and most likely the new cells would stay safely inside even without the lid. Shown here, slightly distorted because the following pictures were taken
through a magnifying glass, is the MP2K battery pack while it is still in one piece. I hadn´t seen one before, neither from the outside nor from the inside.
I contemplated opening it along the line where the two halves of the case were glued (or more likely fused) together, but decided against it as I had
the impression that it would be very difficult to re-glue them in a way that would ensure the pack will remain in one piece over time. Instead, I decided on cutting a lid on one side. That way the
basic structure of the pack would remain intact and most likely the new cells would stay safely inside even without the lid. |
|
|
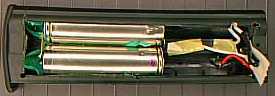
 For cutting out the lid it helps to have a thin piece of metal (like a broad putty
knife or a drywall trowel) you can use as a ruler and something that will temporarily attach it to the pack. This will enable you to cut safely without
risking one or more fingers. Use a very sharp knife like a utility knife or a scalpel. Perfectionists like me will also drill four tiny holes at the corners of
the soon-to-be lid so the knife knows where to stop. For cutting out the lid it helps to have a thin piece of metal (like a broad putty
knife or a drywall trowel) you can use as a ruler and something that will temporarily attach it to the pack. This will enable you to cut safely without
risking one or more fingers. Use a very sharp knife like a utility knife or a scalpel. Perfectionists like me will also drill four tiny holes at the corners of
the soon-to-be lid so the knife knows where to stop. |
|
|
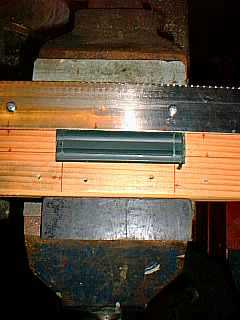 If you plan to do this more often, or if you, like me, simply consider your fingers
an important part of your body that would be a pain to replace, you might want to build a device like the one you see here. Its ingredients are two pieces of plank
which had already been destined for the fireplace, a blunt sawblade, two screws, and 45 minutes of work. If you plan to do this more often, or if you, like me, simply consider your fingers
an important part of your body that would be a pain to replace, you might want to build a device like the one you see here. Its ingredients are two pieces of plank
which had already been destined for the fireplace, a blunt sawblade, two screws, and 45 minutes of work.
While you are at it, you might also want to drill two holes exactly next to each
other somewhere. They should have the same diameter as that of the cells. This will soon make your life much easier. |
|
|
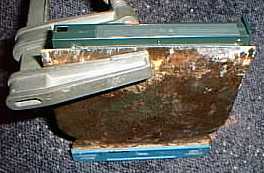
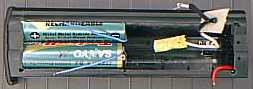
 Done. As you can see, there is a thermistor (a resistor that changes its resistance
with the temperature) on the right-hand side. The white wires of this thermistor are direcly below the case, so apply some caution when cutting the right-hand
edge. The cells are glued to the case, but not very strongly. Use a small kitchen knife as a lever to pry your new lid off. Slowly remove the tape on top of the
thermistor. If you do this slowly enough, you will be able to re-use the tape. Done. As you can see, there is a thermistor (a resistor that changes its resistance
with the temperature) on the right-hand side. The white wires of this thermistor are direcly below the case, so apply some caution when cutting the right-hand
edge. The cells are glued to the case, but not very strongly. Use a small kitchen knife as a lever to pry your new lid off. Slowly remove the tape on top of the
thermistor. If you do this slowly enough, you will be able to re-use the tape. |
|
|
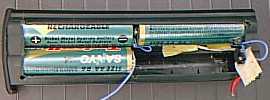
 Although I am perfectly aware that nobody ever heeds any advice I give, I would
strongly recommend that you remove the cells in the order I describe here. There is a reason behind it. Try to avoid moving any cell you are not currently working
on. Do whatever you do very carefully, otherwise you might create dents on the packs bottom side. If this happens, the Newtons spring-loaded eject mechanism will have problems ejecting the pack. Although I am perfectly aware that nobody ever heeds any advice I give, I would
strongly recommend that you remove the cells in the order I describe here. There is a reason behind it. Try to avoid moving any cell you are not currently working
on. Do whatever you do very carefully, otherwise you might create dents on the packs bottom side. If this happens, the Newtons spring-loaded eject mechanism will have problems ejecting the pack.
Using your knife again, cut the connection between the bottom two cells. Doing this will be easier if you stick a
screwdriver between them and push the right cell slightly up. Once the connection is fully cut, pull the right cell to the left
(not too much - pliers will make this easier) until you can get at its positive terminal. There is a red wire soldered to it.
Unsolder it and remove the cell. At that point your life would be easier if you had cut out a bigger lid, but better don´t. If
the lid is only the size you see in the picture, the new cells will stay in the pack even without the lid. |
|
|
 Cut the connection between the top two cells. Again this will be easier if you
push the right one slightly up. Pull the right cell to the left, but not too much. There are two white wires soldered to its right terminal that you don't want to
tear off, and there is a round metal piece (henceforth called RMP) connected to it that should stay intact and unbent as you need to reuse it. Completely
remove the RMP and its counterpart welded to the negative terminal of the cell. Cut the connection between the top two cells. Again this will be easier if you
push the right one slightly up. Pull the right cell to the left, but not too much. There are two white wires soldered to its right terminal that you don't want to
tear off, and there is a round metal piece (henceforth called RMP) connected to it that should stay intact and unbent as you need to reuse it. Completely
remove the RMP and its counterpart welded to the negative terminal of the cell. |
|
|
 This is what connects the left terminals of the remaining two cells. Although it can easily be mistaken
for one, it is not just a sticker. It is a component that will reduce the charge current to about 100 mA if the cell temperature exceeds 55° C (131°F). This is what connects the left terminals of the remaining two cells. Although it can easily be mistaken
for one, it is not just a sticker. It is a component that will reduce the charge current to about 100 mA if the cell temperature exceeds 55° C (131°F). |
|
|
 Lift the right-hand end of the remaining two cells ever so slightly to sever
them from the glue. Push both cells to the right simultaneously. They shouldn't change their position towards each other too much as this might
kill the temperature switch. I leave it to you how you do this, just make sure you don't lose your patience, as along with it you would lose the temperature switch and maybe the case. Lift the right-hand end of the remaining two cells ever so slightly to sever
them from the glue. Push both cells to the right simultaneously. They shouldn't change their position towards each other too much as this might
kill the temperature switch. I leave it to you how you do this, just make sure you don't lose your patience, as along with it you would lose the temperature switch and maybe the case.
Push the bottom cell upwards and try to rotate the top cell while you do this so the temperature switch wont bend. |
|
|
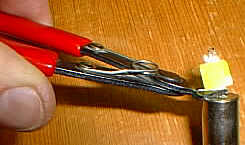 Take out the two cells and remove the temperature switch. Again your kitchen
knife will be helpful. A better method is peeling it off with a small wire cutter as shown in the picture. Take out the two cells and remove the temperature switch. Again your kitchen
knife will be helpful. A better method is peeling it off with a small wire cutter as shown in the picture. |
|
|
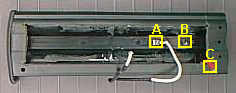
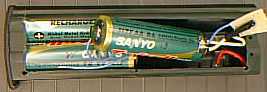
 What we have called RMP so far is the right one of the two round metal
pieces you see in the top right corner of the picture. It is the negative contact of your battery pack and should remain nice and clean. What we have called RMP so far is the right one of the two round metal
pieces you see in the top right corner of the picture. It is the negative contact of your battery pack and should remain nice and clean.
Cut the white wires coming from the thermistor and solder terminal lug B (scroll down for a picture that shows where the solder terminal lugs are
located) where they are soldered to the RMP. Seperate the RMP from its counterpart. Make sure the thin metal strip that connects the two pieces remains with the RMP. Put the RMP in a safe
place for now. Unsolder the white wire from solder terminal lug B and the red wire from solder terminal lug C (they are
usually too thick and too short to re-use them). Don't take too long doing this, otherwise the solder terminal lug will get
too hot which will in turn melt the case. If this happens, buy a sixpack, throw everything except the four new cells in the trash and take the rest of the day off.
Now is an excellent time to deburr both the case and the lid and to remove any remains of glue and plastic. If you think
the tiny amounts of glue you see would certainly not matter, you are wrong. Towards the end of this project things will
become kind of cramped, and you are definitely going to be thankful for every cubic millimeter you now have a chance to claim. |
|
|
If you are a conscientious worker who is doing this for the first time, you will need about one hour until you arrive at this point. Now is the time to go find some new NiMH AA size cells. It is
cheaper, but not advisable, to use standard cells without soldering tabs. Although I have occasionally soldered this kind of cell without harming them, I don´t dare to do so here. It would probably be
possible to solder the RMP to the new cell, but for a cell without soldering tabs this would require so much heat that there´s a more than average chance the cell will be harmed.
Guess what: I´m going
to get me four new cells with soldering tabs. The numbers in the cash register have just made a major leap up: From about US$ 10.00 to about US$ 20.00.
|
|
|
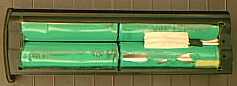
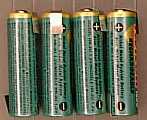 Only two weeks later I received my new cells at last. They were harder to come by at an
affordable price than I had expected. The up side is that these beauties have a capacity of 1850 mAh which makes them more than 50 percent better than those Apple originally used. Only two weeks later I received my new cells at last. They were harder to come by at an
affordable price than I had expected. The up side is that these beauties have a capacity of 1850 mAh which makes them more than 50 percent better than those Apple originally used. |
|
|
 From here on things get kind of tricky. It is crucial that you work as
thoroughly and conscientiously as possible. Generally, it can be said that all soldering done at solder terminal lugs A, B and C should be as short as
possible in order to avoid case damage due to excessive heat. Do not solder the cell tabs for too long, either. These cells have a tendency to react fairly
angrily if they get too hot. All wires should be as short as possible. If you can find it, use wire that has a heatproof insulation so that you won't ruin it
while soldering. You will be able to shorten the time required for soldering if you tin both wire and cell tab before you solder them. It also helps if you
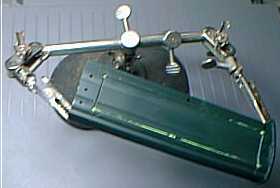
have something that allows you to hold the case in position, for example a gadget like the one you see in the picture. These things cost next to nothing and are a very big help. From here on things get kind of tricky. It is crucial that you work as
thoroughly and conscientiously as possible. Generally, it can be said that all soldering done at solder terminal lugs A, B and C should be as short as
possible in order to avoid case damage due to excessive heat. Do not solder the cell tabs for too long, either. These cells have a tendency to react fairly
angrily if they get too hot. All wires should be as short as possible. If you can find it, use wire that has a heatproof insulation so that you won't ruin it
while soldering. You will be able to shorten the time required for soldering if you tin both wire and cell tab before you solder them. It also helps if you
have something that allows you to hold the case in position, for example a gadget like the one you see in the picture. These things cost next to nothing and are a very big help.
It goes without saying that you need to take care that no wires get caught between the cells and the pack, as this would increase the effective pack size - something you would most certainly regret. |
|
|
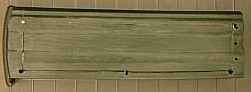
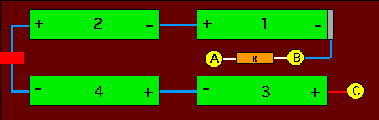 Shown here is a schematic diagram of how the cells are
going to be wired. A, B and C are the solder terminal lugs in the case. The grey rectangle at the right side of cell 1 is the RMP. The orange rectangle between A and B is the
thermistor, the red rectangle is the temperature switch. Shown here is a schematic diagram of how the cells are
going to be wired. A, B and C are the solder terminal lugs in the case. The grey rectangle at the right side of cell 1 is the RMP. The orange rectangle between A and B is the
thermistor, the red rectangle is the temperature switch. |
|
|
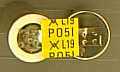
 Here you see where the solder terminal lugs are located in real life. Here you see where the solder terminal lugs are located in real life.
Grab a voltmeter and measure the voltage of the new cells. Memorize the values or, if your memory is as poor as mine, write them down. You will need this
information later to check whether you did everything right. |
|
|
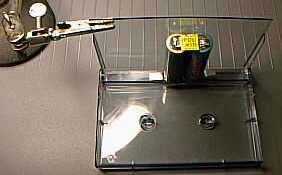 Clean what survived the removal of the temperature switch with a sharp
knife and tin it from both sides. Grab the first two cells and solder on the temperature switch. An audio cassette case is an excellent tool to align the
cells and to ensure they won't move when it is most inconvenient. Solder one end to the positive terminal of the left cell and the other end to the
negative terminal of the right cell. A little offset towards the bottom edge (of this picture) will make it easier getting the cells back into the pack. Clean what survived the removal of the temperature switch with a sharp
knife and tin it from both sides. Grab the first two cells and solder on the temperature switch. An audio cassette case is an excellent tool to align the
cells and to ensure they won't move when it is most inconvenient. Solder one end to the positive terminal of the left cell and the other end to the
negative terminal of the right cell. A little offset towards the bottom edge (of this picture) will make it easier getting the cells back into the pack. |
|
|
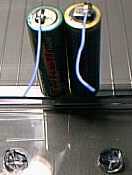
 If you followed my advice, aligning the cells will be no problem whatsoever and you wont
need the cassette case. If you followed my advice, aligning the cells will be no problem whatsoever and you wont
need the cassette case. |
|
|
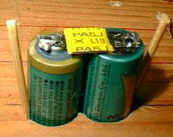
 Solder two pieces of wire to the other ends of the cells. Again the audio cassette case will make
your life easier. It is generally a good idea not to use too much solder as this will unnecessarily increase the effective length of the cells. Solder two pieces of wire to the other ends of the cells. Again the audio cassette case will make
your life easier. It is generally a good idea not to use too much solder as this will unnecessarily increase the effective length of the cells.
Solder two 5 cm (=2) long wires to solder terminal lugs B and C while the pack is still empty. |
|
|
 Take the two cells and push the one whose negative terminal has a wire into the
top position. Try to ensure that the cells don't change their position towards each other as they are currently only connected by the temperature switch which, as I
mentioned, is a fragile thing that is hard to come by. Unless you are interested in first-hand experience of how fast two new and fully charged cells can melt two
wires, make sure the wire ends can't touch. Take the two cells and push the one whose negative terminal has a wire into the
top position. Try to ensure that the cells don't change their position towards each other as they are currently only connected by the temperature switch which, as I
mentioned, is a fragile thing that is hard to come by. Unless you are interested in first-hand experience of how fast two new and fully charged cells can melt two
wires, make sure the wire ends can't touch. |
|
|
 Push both cells as far as possible to the left. Hold the left part of the case while
doing so, otherwise your push might be stronger than what Apple used to glue this part to the case. This would make you say things you'd most likely regret a day later. Push both cells as far as possible to the left. Hold the left part of the case while
doing so, otherwise your push might be stronger than what Apple used to glue this part to the case. This would make you say things you'd most likely regret a day later.
Measure the voltage across the two wires. It should be approximately the sum of the two cell voltages you measured when you began. If it isn't, you have probably just killed the temperature switch. |
|
|
 Use a piece of adhesive tape to fasten the RMP temporarily to the third cells
negative end so it remains centered. Solder the RMPs thin strip you hopefully didnt cut off against my advice to the cells tab. As the RMP needs to be
pushed flat against the case later, solder at the cells side, not at its end. Remove about two millimeters (0.08) of insulation from the dangling end of
the thermistor and from the wire attached to solder terminal lug B and twist the two together. Solder them to the cells negative tab and the RMP. For the same reason as above make sure you solder
them to the tabs inner side. Use as little time and as little solder as possible. Take extreme care that no solder gets on the
outer side of the RMP. This is the part that will be contacted by your Newton, and it should remain as smooth and clean as
you found it. Remove the adhesive tape and use alcohol or whatever you have to remove any residue of the tape's glue. We
want a nice clean contact here! Make sure the RMP is parallel to the cells end. I had to put in two layers of paper between
the RMP and cell to ensure this. Now solder the wire dangling from the negative terminal of cell 2 to the positive terminal of cell 1. Use a piece of adhesive tape to fasten the RMP temporarily to the third cells
negative end so it remains centered. Solder the RMPs thin strip you hopefully didnt cut off against my advice to the cells tab. As the RMP needs to be
pushed flat against the case later, solder at the cells side, not at its end. Remove about two millimeters (0.08) of insulation from the dangling end of
the thermistor and from the wire attached to solder terminal lug B and twist the two together. Solder them to the cells negative tab and the RMP. For the same reason as above make sure you solder
them to the tabs inner side. Use as little time and as little solder as possible. Take extreme care that no solder gets on the
outer side of the RMP. This is the part that will be contacted by your Newton, and it should remain as smooth and clean as
you found it. Remove the adhesive tape and use alcohol or whatever you have to remove any residue of the tape's glue. We
want a nice clean contact here! Make sure the RMP is parallel to the cells end. I had to put in two layers of paper between
the RMP and cell to ensure this. Now solder the wire dangling from the negative terminal of cell 2 to the positive terminal of cell 1. |
|
|
 Push in the cell, starting at the right-hand side. This is about the moment
where people with weak nerves are inclined to have a nervous breakdown. A good way to get around one is by holding the left part of the case again to make sure it won't come off. Push in the cell, starting at the right-hand side. This is about the moment
where people with weak nerves are inclined to have a nervous breakdown. A good way to get around one is by holding the left part of the case again to make sure it won't come off.
Depending on the brand of cells you use one of two things can happen now. Either (due to the fact that that darned top right cell wont go into the pack)
you start pondering whether throwing everything in the trash bin might restore your mental health to normal conditions or
(less likely) you got the cell into the pack just fine and there is now even a gap between the top two cells. If there is,
congratulations! Fill it with something moderately heat-resistant that can't be compressed over time, otherwise the spring
contact in your Newton might eventually push cell 1 to the left which would effectively make the pack useless. |
|
|
 If you are still able to think straight once you get here, the worst part is
over. Solder the wire from solder terminal lug C to the positive terminal of the fourth battery and the wire from the bottom left cell to its negative
terminal. Push the cell in, again starting at the right-hand side. Before you do so, make sure the thermistor wires aren't in the way. They should be in
the middle of the pack. Also make sure the positive terminal of the cell cant touch the RMP / tab / wire combo from the top right cell. Put the thermistor back where it belongs, as close to the cells as
possible, and fix it with the tape. If you are still able to think straight once you get here, the worst part is
over. Solder the wire from solder terminal lug C to the positive terminal of the fourth battery and the wire from the bottom left cell to its negative
terminal. Push the cell in, again starting at the right-hand side. Before you do so, make sure the thermistor wires aren't in the way. They should be in
the middle of the pack. Also make sure the positive terminal of the cell cant touch the RMP / tab / wire combo from the top right cell. Put the thermistor back where it belongs, as close to the cells as
possible, and fix it with the tape. |
|
|
Whew! I see the time for a beer coming closer. Get out your voltmeter again and measure the voltage across the RMP and solder terminal lug C. If everything is ok, you should read approximately the sum
of the four voltage values you measured before you put the cells in. Now measure the resistance across solder terminal lugs A and B. It should be about 10 kiloOhms. This value depends on the ambient
temperature, so don´t worry if the resistance is different. As long as it is in the kiloOhm range, everything is ok.
|
|
|
 Now is the time to glue the lid back on. Put it in place first without glue to
make sure nothing sticks out. This will often be the case in the area where the thermistor is. Use a file or sandpaper to remove some material from the inside of the lid until it fits perfectly. Now is the time to glue the lid back on. Put it in place first without glue to
make sure nothing sticks out. This will often be the case in the area where the thermistor is. Use a file or sandpaper to remove some material from the inside of the lid until it fits perfectly.
Cover the inside of the lid with a thin layer of glue and put it where it belongs. A vice can be a very helpful tool if you don't want to waste your
time pressing the lid on the cells until the glue has cured. This time can be better spent on the beer I recently mentioned.
However, make sure not to apply too much pressure if you use the vice. This would move the cells slightly apart and
permanently increase the size of the case, something you would most definitely regret ever after.
For this reason I do not use a vice anymore. Instead I wrap some tape tightly around the case as shown in the image
above. This is usually sufficient if you have worked well enough with your file a minute ago. |
|
|
 If you are lucky, the pack will now slip into the Newton as it did before. If you
arent, do not force it in, you will have a hard time getting it out again. Apart from that, this is a good way to damage your Newton. Instead, get some
sandpaper and flatten everything that used to be flat before you started. If it is still too big, continue sanding until the pack is small enough again. In my
experience this is required for two out of three packs. If you are lucky, the pack will now slip into the Newton as it did before. If you
arent, do not force it in, you will have a hard time getting it out again. Apart from that, this is a good way to damage your Newton. Instead, get some
sandpaper and flatten everything that used to be flat before you started. If it is still too big, continue sanding until the pack is small enough again. In my
experience this is required for two out of three packs. |
|
|
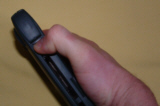 In some cases the pack will still be kind of reluctant to leave its home. This is because there are
amazing manufacturing tolerances for both Newtons and battery packs. Ive had packs that could be ejected easily from one Newton, but were very difficult to get out of another Newton.
If this happens, do not (as in: NEVER EVER) try to pry your pack out with a tool (fingernails count as tools in this context). The front part of the pack (what you see while the pack is
inserted) is glued to the rest of the pack, but not very well. Applying too much force might tear said front part off, giving you an even harder time to get your pack out. In some cases the pack will still be kind of reluctant to leave its home. This is because there are
amazing manufacturing tolerances for both Newtons and battery packs. Ive had packs that could be ejected easily from one Newton, but were very difficult to get out of another Newton.
If this happens, do not (as in: NEVER EVER) try to pry your pack out with a tool (fingernails count as tools in this context). The front part of the pack (what you see while the pack is
inserted) is glued to the rest of the pack, but not very well. Applying too much force might tear said front part off, giving you an even harder time to get your pack out.
The good news is that there is a way to eject Newton 2x00 packs partially without even touching them. As shown here, hold the Newton in one hand and unlock the pack with your thumb. |
|
|
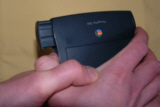 While keeping the pack unlocked by means of the aforementioned thumb, push said thumb
against your other hand. A good place for them to meet is between thumb and index finger. Do not push too strongly at first, otherwise the pack might all of a sudden consider it funny to get
airborne and try out how far it can move until something happening to be located in its flight path stops it quite apruptly. You can always push more vigorously if your first attempt does not
yield the expected result. While keeping the pack unlocked by means of the aforementioned thumb, push said thumb
against your other hand. A good place for them to meet is between thumb and index finger. Do not push too strongly at first, otherwise the pack might all of a sudden consider it funny to get
airborne and try out how far it can move until something happening to be located in its flight path stops it quite apruptly. You can always push more vigorously if your first attempt does not
yield the expected result.
Once the pack is ejected as much as shown here, you can pull it out, but even now do NOT pull at its front. |
|
|
By now you might be wondering where on earth to get AA size NiMH rechargeables with soldering tabs. Until recently you would have found a table with suppliers and their prices here. Meanwhile I have
removed it because it was outdated. If you know of a supplier who sells these cells at a reasonable price, I would be thankful for a tip.
|
|
|
That is it. Not that difficult, was it? However, since I have put up this page a couple of people have asked me if I would do the refurbishing for them. The short answer is Yes, I would.
The slightly more detailed answer is Yes, I would - provided you are aware of the following...
Decent battery cells arent exactly cheap each over here in Germany. Come to think of it, they are far
from that. Moreover, the shipping rates of German postal services border on legalized robbery (for one pack between 8 and 11 EUR depending on where you live and whether you prefer surface or air mail).
This, plus the fact that after spending 3-4 hours on a rebuild I will probably feel better if I have made at least a tiny profit, brings the total price to 35 EUR plus shipping at cost.
In a nutshell
this means that you would get back a pack with 1.75 times the capacity of Apples original pack. But youd have to say goodbye to 35 EUR plus whatever it costs me to ship them back at cost plus whatever
it costs you to get them to Germany in the first place.
If all this doesnt deter you, feel free to drop me a line.
Questions? Dead links? Anything unclear? Any syntax or grammatical errors in this description? Feel free to tell me about them. Yes, really. Dont be polite, be helpful. If you arent, how am I supposed to improve my English?
Nothing like that? This page really helped you? Wow! What a perfect reason to sign my guest book...
Ready for the theory? You will find everything you ever wanted to know about rechargeables and a whole lot more here.
If you happen to be interested in reviews of books on batteries, rechargeables and charging concepts, please see my battery books page.
|
|
|
|
|
|