So you want to take apart your trusty old MessagePad 120? Here are the instructions...
In case you just want to replace a broken display and your data is still intact, you might want to consider downloading DataRescue (5 kB) before you begin. This little package does nothing but automatically open the Connection slip and wait for your desktop machine to get into contact. You will then be able to back up your data from the desktop using the Newton Backup Utilities (PC version or Mac version) or similar software. DataRescue does so when it is
installed, e.g. when a card is inserted or the MessagePad is reset. In an emergency case like yours it can be installed on a card via a second MessagePad.
If you do not want to replace a broken
display, make sure that this kind of surgery is really necessary. I hesitate to mention it, but check the contrast setting. If that isnt the problem, many Newtons can still be revived by simply doing
the following:
a) If you have a memory card installed, remove it. Some cards can be killed by the hard reset involved in the following procedure. b)
Remove the main batteries and the backup battery. c)
Press the power switch and put something between the switch and the case to keep it pressed (use a piece of paper or cardboard folded to the required thickness). d)
Leave the Newton alone for a day. Ignore anyone telling you 15 minutes will be enough, leave it alone for a day. e)
Make sure both the main batteries (non-rechargeable alkalines, do not use rechargeables) and the backup battery are fresh. In this context fresh means at least 1.5 volts each for the alkalines, at least 3.0 volts for the backup battery.
f) Remove whatever you used to hold the power switch down and install the backup battery. g) Install the main batteries.
A fair amount of Newtons will re-enter the mysterious
world of PDAs world alive and healthy after this procedure. If yours doesnt, get your ac adapter and make sure that it works. Works in this context means around 7 volts at the plug that goes into the
Newton. Dont continue if the voltage isnt at least 6 volts. NEVER continue if the voltage is more than 7.5 volts because you can very easily kill your Newton that way. Plug in the ac adapter and do
a hard reset. Make sure you do not have rechargeable or partially discharged non-rechargeable main batteries installed at this time, you wouldnt be the first one who has steered his Newton into a coma
that way, making things worse than before. A hard reset is done as follows:
1) Make sure all cards are removed. 2)
Press the reset button in the battery compartment and keep it pressed. 3) Press the power switch and keep it pressed. 4) Release the reset button. 5)
Wait for the Erase all data? dialog. 6) Release the power switch. It is usually safer to let the Newton go ahead and erase all data because there is probably some corrupted data that will
cause you trouble again.
No dice? Ok, then lets do the real thing! But before we start, some words of warning...
What you are going to do now will take place very close to delicate electronic parts. Something that will
definitely make these parts very angry is their getting in touch with static electricity. Depending on humidity, material used in your carpet and clothing and a couple of other things there will be a
certain amount of static electricity on your body. Make sure to discharge yourself frequently before touching the Newton. About the best way to do this is by touching a metal faucet, but any large part
of metal (like a metal door, bed frame etc.) will also do. The same applies to your soldering iron. Unless you have a soldering station with an extra grounding wire, it wont hurt to discharge the tip as
frequently and in the same way as yourself.
Due to my annoying habit of polluting the internet with weird abbreviations the top half of the case will from now on be called ToHOC. The bottom half (the one you see in the picture below) will be
called BoHOC, and the main logic boards name will henceforth be MaLoBo. The twenty screws you will have to remove have different lengths and threads, this is why I have numbered them. If your memory
is as poor as mine, it might help to draw twenty rectangles on a piece of paper, number them from one to twenty and fix each screw with a small piece of adhesive tape to its very own rectangle.
Pardon? No, you cant avoid the tape. If you try, the paper will find a way to the floor as soon as you place the last screw on it.
Remove the main batteries and the backup battery. Remove whatever card
is in the card slot. Remove the stylus and the flip cover. The latter is removed by simply tearing at it with gentle force. Be aware that from
now on your Newtons screen is unprotected, so it is a good idea to cover your working area with a piece of soft cloth to avoid scratches. You can
leave screws 9 and 10 where they are unless you want to remove the display unit from the ToHOC. The other screws keep the ToHOC attached to the BoHOC. Remove them one at a time. I am aware that they look
rather innocent, but believe me, they arent. Fact is that ever since they have been fastened at the Apple assembly line they have been waiting for this very moment. Now, for the first time ever,
they have a chance to hide in your carpet and wait patiently for being sucked into your vacuum cleaner after you gave up searching for them, and believe me, this is exactly
what they are going to do unless you spoil their plan by removing them one at a time and putting each one in a safe place before taking care of the next one.
Ready for the most difficult part? Ok, lets try to seperate the ToHOC from the BoHOC. Your mileage may vary, but I have found the easiest way to do it is like that: Pick up the Newton in your left
hand so that the BoHOC points upwards and your left hands thumb is on the ToHOC between the upper edge of the card slot and where the stylus goes. Your right hands thumb is on the BoHOC in the middle
of the card slot. Press your left thumb inwards and use your right thumb to move the BoHOC upwards. This should partially seperate ToHOC and BoHOC at the Newtons top edge. Now move your left hands
thumb to about where the card eject button is and your right hands thumb to the lower edge of the card slot. Press and move again. Repeat this procedure at the bottom where the serial port is.
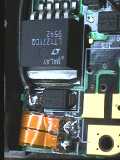
Remove the transparent red plastic part A next to the infrared mirror. Remove screws
11 - 14. 11 and 12 have a thread different from that of 13 and 14, so make sure you remember which one goes where. Put the small rectangular metal piece that was
fastened by 13 and 14 in a safe place. Now unlock the connector marked by the green rectangle. This is done by pressing the left (usually black) part of the connector
outwards. Remove the ribbon cable from the connector. Avoid touching the cables connector pads. In case you tried to remove the cable without unlocking the connector
first, let me assure you that there are more important things in life than having just killed a trusty companion. But not very many.
Yes, I am perfectly aware that the image to the left would be even more useful if
the letters and numbers were closer to the rectangles. But they would be much worse to read. Sorry for the slight inconvenience... Remove the rubber protection cover C.
Remove the plastic part B that operates the power switch. Remove screw 15. Now is the time to heat up your soldering iron. Unsolder the thick red power supply wire a. The best chance of not
melting part of the battery compartment during this process is by attacking from the left, i. e. arranging yourself and the Newton in a way that the
soldering iron enters the picture shown above from the left side and its tip points towards the battery compartment. Now unsolder the two ribbon cables b
and c. The easiest way to do this is to stick a thin screwdriver underneath the cable and push it upwards while melting the solder of both soldering pads at the
same time. Your life will be easier if you take out the speaker and put it somewhere where its wires arent in the way before unsoldering the bottom cable. Unsolder the thick black power supply wire d.
Finally, unsolder cable e. It is an excellent idea to do this as fast as possible, unfortunately the
insulation of this cable is far from heat-resistant. You can now remove the MaLoBo. Grabbing the small board where the serial port is and dragging
it upwards usually yields the quickest result. Take care not to hurt any cables, especially the ribbon cables are kind of fragile and wont withstand brutal force for very long. Put the MaLoBo in a safe
place. As static electricity has a tendency to lurk everywhere, you might want to wrap it (the MaLoBo, not the electricity) in a piece of aluminum foil before doing so.
Observant readers might have noticed that the picture to the left is not from
a MP120, but from a MP130. Dont worry, the procedure is identical... If you need to remove the display unit, remove screws 16 - 19. They have
different lengths, so make sure you remember which one goes where. Remove screws 9 and 10 unless you have already done so when you started.
Take special care not to touch the ribbon cable g. If you plan to replace the display unit with one from another Newton, save yourself the time for all
this, it is way faster to simply use the whole assembly including the other Newtons ToHOC and put the MaLoBo you just removed in there.
This is about as far as it makes sense to go unless you want to replace the
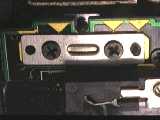
display unit with an original Apple service part (which is as unlikely as it is expensive). In the area marked by the red rectangle are two tiny metal
springs that have the very same urge as the screws I was recently talking about. Make sure they stay in place. A piece of adhesive tape might come in handy here.
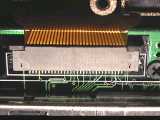
Here is a close look at the ribbon cable I told you not to touch some time ago. If you want to
remove the display, you will have to unlock it. To do so, stick a thin screwdriver underneath and push it upwards until it comes off the plastic pin. Make sure you dont touch it. Now
remove the rubber and the metal part below the cable and put them in a safe place. The metal part is slightly different on the top and the bottom side, so make sure you remember which side was up.
This is also a picture of a MP130. Again, the procedure is the same.
Remove screw 20. Lift the display at the bottom side where you just removed the screw and move it upwards. That was it. You cant possibly
take this thing apart any further. Unless, of course, you have a bit of Indiana Jones in you. In that case you might want to have a look here.
Congratulations. Well done! Shown here are, apart from the display which
needs to be replaced, all the pieces you are now expected to reassemble in a way that will turn them into a working Newton again. Of course assembly is
basically the same as disassembly, only in reverse direction. There are, however, some traps and pitfalls, so allow me to make this already way too
long page even longer by pointing out what is likely to make you forget your good upbringing and say things you would be very ashamed of a day later.
Make sure the plastic part that locks / unlocks the flip cover is installed properly and that
both springs are where they belong. Due to a temporary lack of attention I managed to get this picture wrong. Actually the larger spring must be where the smaller one is shown and vice versa.
Before putting the MaLoBo back in, make sure the ribbon cable (g) is properly installed. Put
the metal piece on the two plastic pins (flat side up), put the rubber piece on top of the metal piece, then put the cable on top of the rubber piece, fixing it using its hole and the middle plastic pin.
When putting the MaLoBo back in, there are a couple of things you need to watch out for. For one, make sure all cables are where they need to be in order to re-solder them or get them back into their
connectors. Especially the ribbon cables have a tendency to hide below the MaLoBo. The thick red power supply wire (a) likes to be caught in the gap between the MaLoBo and the
battery compartment, this will effectively prevent getting the MaLoBo in place. The MaLoBo has a small rectangular notch next to the red wires soldering pad, make sure the wire goes through there.
Screws 11 and 12 have a thread different from that of screws 13 and 14. In case you have
forgotten which was where: 13 and 14 have a thread usually seen on screws screwed into a nut. Tighten them a bit more than the others, it is crucial that the ribbon cable (g) is securely
connected to the MaLoBo. Talking about screws 13 and 14: This is about the time where observant people usually notice that the other metal piece, just like its counterpart now under the MaLoBo
, is different on the top and the bottom side, too. In case you dont remember which side was up when you removed it: The side with the raised part must point to the board.
Makesure you solder the black power supply wire (d) in a way that allows it to rest in the gap between the case and the MaLoBo, and not in the space between the battery compartment and the
MaLoBo.
Do not forget to lock the connector.
Once all wires are soldered, make sure you put the rubber protection cover (C), the transparent red plastic part (A) and the part that operates
the power switch (B) back where they belong. Occasionally B has the annoying habit of not staying in place when you try to put the BoHOC back on the ToHOC.
Make sure the speaker stays in place, this thing has a tendency to turn when it is most inconvenient.
Easy, wasnt it? As I am sure you are not going to forget to put the BoHOC back on the ToHOC, fasten it with the screws that didnt make it to your carpet, install the backup battery and the main
batteries, and put the flip cover back on anyway, I will refrain from suggesting it. Only one last tip: Whenever you tighten a screw, make sure to turn it counterclockwise before doing so until you hear
a click. That way you will ensure that it doesnt cut a new thread into its counterpart.
That was it. Be assured that once you have done this about ten times, you will be able to completely
disassemble and reassemble a 120 within half an hour or less... Just in case you have lost all courage by now and think youd never be able to do this: Dont throw your 120 in the trash just yet.
There is always Dr. Newton, also known as Dave Watson or Digital Ocean Dave. Apart from the fact that he is a very nice guy, he is also known for exceptionally fast and professional Newton repairs and
updates at a reasonable price. You can email him at
. The shipping cost
between Germany and the US is outrageous, though. Moreover, the only affordable way (USPS surface) can take up to six weeks each way. Depending on my spare parts level I am sometimes able to fix
things, too. If you live closer to Germany than to the US of A, you might want to inquire whether this is currently the case.
Dead links? Questions? Anything unclear? Any syntax or grammatical errors in this description? Feel free to tell me about it. Yes, really. Dont be polite, be helpful. If you arent, how am I supposed to improve my English?
Nothing like that? This page really helped you? Wow! What a perfect reason to sign my guest book...

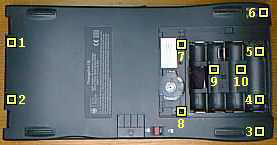 Remove the main batteries and the backup battery. Remove whatever card
is in the card slot. Remove the stylus and the flip cover. The latter is removed by simply tearing at it with gentle force. Be aware that from
now on your Newtons screen is unprotected, so it is a good idea to cover your working area with a piece of soft cloth to avoid scratches. You can
leave screws 9 and 10 where they are unless you want to remove the display unit from the ToHOC. The other screws keep the ToHOC attached to the BoHOC. Remove them one at a time. I am aware that they look
rather innocent, but believe me, they arent. Fact is that ever since they have been fastened at the Apple assembly line they have been waiting for this very moment. Now, for the first time ever,
they have a chance to hide in your carpet and wait patiently for being sucked into your vacuum cleaner after you gave up searching for them, and believe me, this is exactly
what they are going to do unless you spoil their plan by removing them one at a time and putting each one in a safe place before taking care of the next one.
Remove the main batteries and the backup battery. Remove whatever card
is in the card slot. Remove the stylus and the flip cover. The latter is removed by simply tearing at it with gentle force. Be aware that from
now on your Newtons screen is unprotected, so it is a good idea to cover your working area with a piece of soft cloth to avoid scratches. You can
leave screws 9 and 10 where they are unless you want to remove the display unit from the ToHOC. The other screws keep the ToHOC attached to the BoHOC. Remove them one at a time. I am aware that they look
rather innocent, but believe me, they arent. Fact is that ever since they have been fastened at the Apple assembly line they have been waiting for this very moment. Now, for the first time ever,
they have a chance to hide in your carpet and wait patiently for being sucked into your vacuum cleaner after you gave up searching for them, and believe me, this is exactly
what they are going to do unless you spoil their plan by removing them one at a time and putting each one in a safe place before taking care of the next one.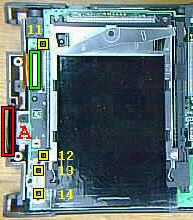 Remove the transparent red plastic part A next to the infrared mirror. Remove screws
11 - 14. 11 and 12 have a thread different from that of 13 and 14, so make sure you remember which one goes where. Put the small rectangular metal piece that was
fastened by 13 and 14 in a safe place. Now unlock the connector marked by the green rectangle. This is done by pressing the left (usually black) part of the connector
outwards. Remove the ribbon cable from the connector. Avoid touching the cables connector pads. In case you tried to remove the cable without unlocking the connector
first, let me assure you that there are more important things in life than having just killed a trusty companion. But not very many.
Remove the transparent red plastic part A next to the infrared mirror. Remove screws
11 - 14. 11 and 12 have a thread different from that of 13 and 14, so make sure you remember which one goes where. Put the small rectangular metal piece that was
fastened by 13 and 14 in a safe place. Now unlock the connector marked by the green rectangle. This is done by pressing the left (usually black) part of the connector
outwards. Remove the ribbon cable from the connector. Avoid touching the cables connector pads. In case you tried to remove the cable without unlocking the connector
first, let me assure you that there are more important things in life than having just killed a trusty companion. But not very many.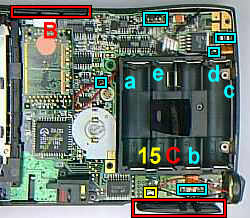 Yes, I am perfectly aware that the image to the left would be even more useful if
the letters and numbers were closer to the rectangles. But they would be much worse to read. Sorry for the slight inconvenience...
Yes, I am perfectly aware that the image to the left would be even more useful if
the letters and numbers were closer to the rectangles. But they would be much worse to read. Sorry for the slight inconvenience... Finally, unsolder cable e. It is an excellent idea to do this as fast as possible, unfortunately the
insulation of this cable is far from heat-resistant.
Finally, unsolder cable e. It is an excellent idea to do this as fast as possible, unfortunately the
insulation of this cable is far from heat-resistant.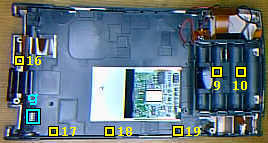 Observant readers might have noticed that the picture to the left is not from
a MP120, but from a MP130. Dont worry, the procedure is identical...
Observant readers might have noticed that the picture to the left is not from
a MP120, but from a MP130. Dont worry, the procedure is identical...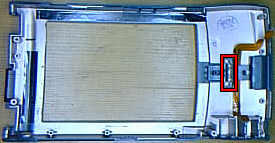 This is about as far as it makes sense to go unless you want to replace the
display unit with an original Apple service part (which is as unlikely as it is expensive). In the area marked by the red rectangle are two tiny metal
springs that have the very same urge as the screws I was recently talking about. Make sure they stay in place. A piece of adhesive tape might come in handy here.
This is about as far as it makes sense to go unless you want to replace the
display unit with an original Apple service part (which is as unlikely as it is expensive). In the area marked by the red rectangle are two tiny metal
springs that have the very same urge as the screws I was recently talking about. Make sure they stay in place. A piece of adhesive tape might come in handy here.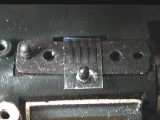 Here is a close look at the ribbon cable I told you not to touch some time ago. If you want to
remove the display, you will have to unlock it. To do so, stick a thin screwdriver underneath and push it upwards until it comes off the plastic pin. Make sure you dont touch it. Now
remove the rubber and the metal part below the cable and put them in a safe place. The metal part is slightly different on the top and the bottom side, so make sure you remember which side was up.
Here is a close look at the ribbon cable I told you not to touch some time ago. If you want to
remove the display, you will have to unlock it. To do so, stick a thin screwdriver underneath and push it upwards until it comes off the plastic pin. Make sure you dont touch it. Now
remove the rubber and the metal part below the cable and put them in a safe place. The metal part is slightly different on the top and the bottom side, so make sure you remember which side was up.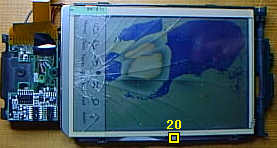 This is also a picture of a MP130. Again, the procedure is the same.
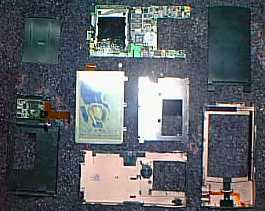 Congratulations. Well done! Shown here are, apart from the display which
needs to be replaced, all the pieces you are now expected to reassemble in a way that will turn them into a working Newton again. Of course assembly is
basically the same as disassembly, only in reverse direction. There are, however, some traps and pitfalls, so allow me to make this already way too
long page even longer by pointing out what is likely to make you forget your good upbringing and say things you would be very ashamed of a day later.
Congratulations. Well done! Shown here are, apart from the display which
needs to be replaced, all the pieces you are now expected to reassemble in a way that will turn them into a working Newton again. Of course assembly is
basically the same as disassembly, only in reverse direction. There are, however, some traps and pitfalls, so allow me to make this already way too
long page even longer by pointing out what is likely to make you forget your good upbringing and say things you would be very ashamed of a day later.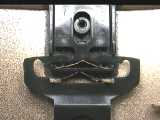 Make sure the plastic part that locks / unlocks the flip cover is installed properly and that
both springs are where they belong.
Make sure the plastic part that locks / unlocks the flip cover is installed properly and that
both springs are where they belong.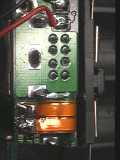
 Screws 11 and 12 have a thread different from that of screws 13 and 14. In case you have
forgotten which was where: 13 and 14 have a thread usually seen on screws screwed into a nut. Tighten them a bit more than the others, it is crucial that the ribbon cable (g) is securely
connected to the MaLoBo. Talking about screws 13 and 14: This is about the time where observant people usually notice that the other metal piece, just like its counterpart now under the MaLoBo
, is different on the top and the bottom side, too. In case you dont remember which side was up when you removed it: The side with the raised part must point to the board.
Screws 11 and 12 have a thread different from that of screws 13 and 14. In case you have
forgotten which was where: 13 and 14 have a thread usually seen on screws screwed into a nut. Tighten them a bit more than the others, it is crucial that the ribbon cable (g) is securely
connected to the MaLoBo. Talking about screws 13 and 14: This is about the time where observant people usually notice that the other metal piece, just like its counterpart now under the MaLoBo
, is different on the top and the bottom side, too. In case you dont remember which side was up when you removed it: The side with the raised part must point to the board.