|
 Deutsche Version
dieser Seite Deutsche Version
dieser Seite |
|
|
|
Some of us Newton 120 and 130 owners have seen this mode appear out of the blue without having done anything to invoke it. To the best of my knowledge, though, even those lucky people have never been
able to reproduce it.
Most of us, however, have never seen it yet, simply because Apple never wanted us to see it.
Exactly here, by the way, is an excellent place to tell you about my disclaimer. You should be aware that what you are going to do will take place close to delicate electronic parts that have a tendency to react annoyingly
angry when not treated the way they think they deserve. So if while trying to invoke this mysterious mode your pet dies, your house burns down or your partner (or even worse your Newton) leaves you, it
is entirely your fault, not mine. I told you so. And the fact that you will remove both the main and the backup battery should be sufficient threat to make you do two full backups before you proceed.
Now that this is settled, lets get started...
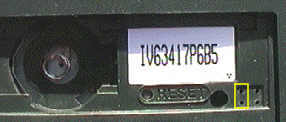 What you see here is the area above your Newtons battery compartment.
What you need to do is, among other things, to connect the two test pads that are on the main logic board beneath the two holes marked by the yellow rectangle. What you see here is the area above your Newtons battery compartment.
What you need to do is, among other things, to connect the two test pads that are on the main logic board beneath the two holes marked by the yellow rectangle. |
|
|
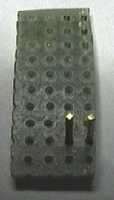 The test pads on the main logic board are very small, therefore it is a good idea to build a little tool
like the one you see in the picture. The diameter of the pins should be only minimally smaller than the
diameter of the holes in the case to ensure that the pins line up properly and exactly vertically on the
main logic board. Allow for eight millimeters pin length to ensure the pins will really reach the test pads.
The test pads on the main logic board are very small, therefore it is a good idea to build a little tool
like the one you see in the picture. The diameter of the pins should be only minimally smaller than the
diameter of the holes in the case to ensure that the pins line up properly and exactly vertically on the
main logic board. Allow for eight millimeters pin length to ensure the pins will really reach the test pads.
The two bottom test pads from the square shown in the picture above are connected to ground, so you can also build a cable that has a clip on one end and a thin tip on the other end. Clipping one end to
the negative terminal of the bottommost battery and connecting the other end to the top left test pad will do the same as the little tool you see here, but in my experience more reliably. |
|
|
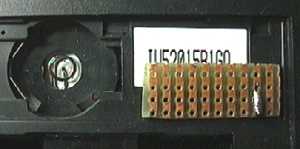
 If you cant get it to work through the case, you might want to disassemble the Newton.
See my disassembly instructions for information on how to do this. If you cant get it to work through the case, you might want to disassemble the Newton.
See my disassembly instructions for information on how to do this.
The two test pads marked by the yellow rectangle are those that need to be connected. |
|
|
 Before you start, remove the main battery and the backup battery. Press
the power switch a couple of times and keep it pressed for some seconds. If you have a power adapter, go get it, otherwise buy 4 new alkalines or use fully charged rechargeables. Before you start, remove the main battery and the backup battery. Press
the power switch a couple of times and keep it pressed for some seconds. If you have a power adapter, go get it, otherwise buy 4 new alkalines or use fully charged rechargeables.
The trick is to make the connection before the Newton gets power. Use one hand to apply whatever means you decided on using to make the
connection, then use the other hand to plug in the ac adapter. If you are successful (which you cant see as the Newton will most likely be lying
face down), you will hear an ugly beep. If you arent, you will, after some seconds, hear the normal startup sound. Leave the connection where it is for about 5 seconds after the beep. You can then
remove it, the Newton will stay in the diagnostic mode.
If you want to do this with batteries, put in 3 of them normally and the fourth in a way that it doesnt yet make contact.
When you have ensured the connection of the two test pads, just press the fourth battery down. Make sure you use new
batteries or fully charged rechargeables as some of the tests seem to consume so much current that your Newton will turn off when powered by partially discharged batteries.
It might well be that you wont succeed the first time. Dont worry, you eventually will. I can get this mode about two times out of three on a Newton 120 and a Newton 130.
There might be cases where the diagnostic mode is extemely reluctant to show up. In these cases you can improve your
chance of success by connecting the two right test pads (those to the right of the yellow rectangle) or by connecting the top
right one to the negative terminal of the bottommost battery for a little time before you start the procedure described
above. This seems to have the same effect as pressing the power switch for a long time, but it appears to be faster and more effective. |
|
|
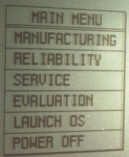 If all went well, your Newton will greet you with a start screen that asks you to tap in the top left
and in the bottom right corner to align the pen. Once you have done this, you can press Go. After that you will see the main menu shown here and a menu bar located at the top of the screen. If all went well, your Newton will greet you with a start screen that asks you to tap in the top left
and in the bottom right corner to align the pen. Once you have done this, you can press Go. After that you will see the main menu shown here and a menu bar located at the top of the screen.
As time permits I will try to find out what all these tests do. A first quick run-through revealed that there are some traps and pitfalls that should be avoided. If you are interested in Newton
diagnostics, it probably wouldnt hurt to bookmark this page and come back occasionally. Until then: Happy diagnosing... |
|
|
Finally, I would like to thank Bob Redknap. Apart from the fact that he stumbled across what I had been doing wrong all the time I spent on trying to invoke this mode, he also was (and still is) very
helpful in shedding, ray by painful ray, new light on it. I sincerely hope that his already half-dead Newton 130 will keep the little life thats still in it in spite of the reckless treatment it
currently has to endure for the sake of science. Hopefully, better understanding of this interesting diagnosis tool will eventually lead to a clue as to what exactly is wrong with his 130...
|
|
|
|
|
|
|
|