|
 Deutsche Version dieser Seite Deutsche Version dieser Seite |
|
|
|
Ok, so you want to rebuild your Apple eMate battery pack. Let me assure you first of all that today is your lucky day. The eMates battery pack can be refurbished much easier than most Newton packs.
Of course it can never hurt to do a full backup before you start this procedure. An excellent backup tool is the Newton Backup Utility (NBU) for Mac or the Newton Backup Utility (NBU) for PC.
|
|
|
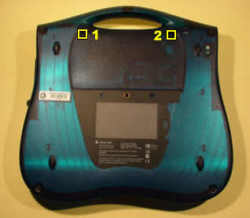 Close the display lid and turn the eMate over. Now you need a torx (T-8) head
screwdriver to remove the two screws marked in the picture. Do not try to use anything else if you dont have that particular screwdriver, better get one at
Sears or RadioShack. Screws like that have the annoying tendency to become extremely stubborn if they arent removed with the tools they think they are
entitled to. Frequently this results in their flatly refusing to be removed at all, no matter which tool you apply. Close the display lid and turn the eMate over. Now you need a torx (T-8) head
screwdriver to remove the two screws marked in the picture. Do not try to use anything else if you dont have that particular screwdriver, better get one at
Sears or RadioShack. Screws like that have the annoying tendency to become extremely stubborn if they arent removed with the tools they think they are
entitled to. Frequently this results in their flatly refusing to be removed at all, no matter which tool you apply. |
|
|
 What you are going to do now will take place very close to delicate electronic
parts. Something that will definitely make these parts very angry is their getting in touch with static electricity. Depending on humidity, material used in your
carpet and clothing and a couple of other things, there will be a certain amount of static electricity on your body. Make sure to discharge yourself frequently
before touching the eMate. About the best way to do this is by wearing a grounded wriststrap. If you dont have such a beast, discharge yourself by
touching a metal faucet or any large piece of metal (like a metal door, bed frame etc.). What you are going to do now will take place very close to delicate electronic
parts. Something that will definitely make these parts very angry is their getting in touch with static electricity. Depending on humidity, material used in your
carpet and clothing and a couple of other things, there will be a certain amount of static electricity on your body. Make sure to discharge yourself frequently
before touching the eMate. About the best way to do this is by wearing a grounded wriststrap. If you dont have such a beast, discharge yourself by
touching a metal faucet or any large piece of metal (like a metal door, bed frame etc.).
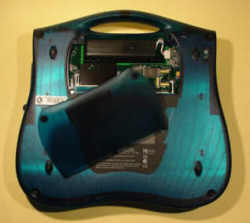
Tilt up the access door at the handle side and remove it. |
|
|
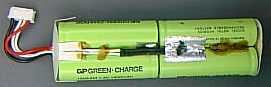
 Disconnect the battery connecor J11 and remove the battery. Using a fingernail
or another non-metallic tool when removing the connector will reduce strain on the wires and on the main logic board. Disconnect the battery connecor J11 and remove the battery. Using a fingernail
or another non-metallic tool when removing the connector will reduce strain on the wires and on the main logic board. |
|
|
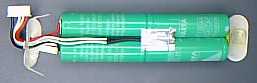
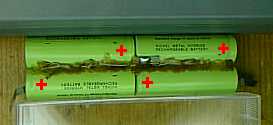
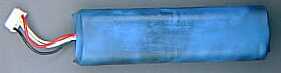
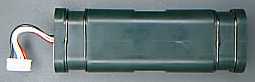 Shown here is the pack. Yours might look slightly different, Ive been told of
eMates whose battery packs didnt have the battery sleeve with the clips. Shown here is the pack. Yours might look slightly different, Ive been told of
eMates whose battery packs didnt have the battery sleeve with the clips. |
|
|
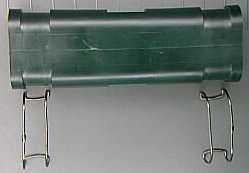
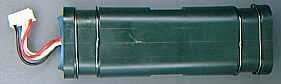
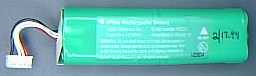 Push the packs guts to the left and put the case aside. The guts are not glued
to the case, but are only held by the two metal clips, so by applying some gentle force you will be able to get them out easily. Get yourself a sharp
knife and remove the heat shrink tubing. Unless you have a new piece in the drawer, do so carefully as you will need it when you reassemble the pack. Do
not cut along the middle of the pack as there is a small thermistor (a resistor that changes its resistance with the
temperature) in that area which you dont want to damage. Better cut directly on the cells along the top or bottom. Push the packs guts to the left and put the case aside. The guts are not glued
to the case, but are only held by the two metal clips, so by applying some gentle force you will be able to get them out easily. Get yourself a sharp
knife and remove the heat shrink tubing. Unless you have a new piece in the drawer, do so carefully as you will need it when you reassemble the pack. Do
not cut along the middle of the pack as there is a small thermistor (a resistor that changes its resistance with the
temperature) in that area which you dont want to damage. Better cut directly on the cells along the top or bottom. |
|
|
 Do not put the sharp knife away yet. You will now use it for cautiously
removing a) the cardboard pieces glued to the right and left hand sides of the pack and b) the silvery piece of tape (from now on called s_p_o_t) under which
the thermistor hides. Do this slowly and patiently, as you will need these pieces when you reassemble the pack. Take extreme care not to damage the thermistor when you remove the s_p_o_t. Do not put the sharp knife away yet. You will now use it for cautiously
removing a) the cardboard pieces glued to the right and left hand sides of the pack and b) the silvery piece of tape (from now on called s_p_o_t) under which
the thermistor hides. Do this slowly and patiently, as you will need these pieces when you reassemble the pack. Take extreme care not to damage the thermistor when you remove the s_p_o_t. |
|
|
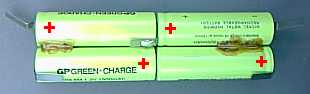
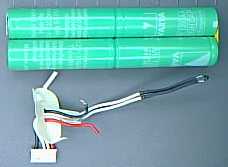 Unsolder the red and the black wire. Put the assembly of wires, connector,
thermistor and cardboard shown in the bottom half of the picture in a safe place. Unsolder the red and the black wire. Put the assembly of wires, connector,
thermistor and cardboard shown in the bottom half of the picture in a safe place. |
|
|
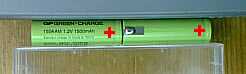
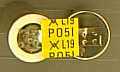 This is what connects the right terminals of the two right cells. It is not just a sticker although it can
easily be mistaken for one. It is a component that will reduce the charge current to about 100 mA if the cell temperature exceeds 55 degrees celsius. This is what connects the right terminals of the two right cells. It is not just a sticker although it can
easily be mistaken for one. It is a component that will reduce the charge current to about 100 mA if the cell temperature exceeds 55 degrees celsius. |
|
|
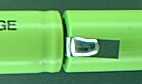
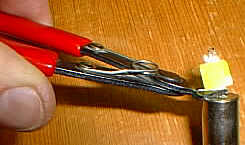 Remove the temperature switch carefully. A kitchen knife will be helpful again. A
better method is peeling it off with a small wire cutter as shown in the picture. Remove the temperature switch carefully. A kitchen knife will be helpful again. A
better method is peeling it off with a small wire cutter as shown in the picture. |
|
|
 Get yourself four new AA size NiMH batteries with as much capacity as you can get. The cells I
am currently using (not those you see here - Im just too lazy to take new pictures) have 1850 mAh capacity and are thus more than 50 percent better than the original cells. Get yourself four new AA size NiMH batteries with as much capacity as you can get. The cells I
am currently using (not those you see here - Im just too lazy to take new pictures) have 1850 mAh capacity and are thus more than 50 percent better than the original cells.
Although this type of cell is a bit more expensive, I would recommend getting cells with soldering tabs as you will need less heat to solder these. Rechargeables have a tendency to react fairly
angrily if they are treated with excessive heat. Measure each cells voltage and write it down unless your memory is way better than mine. |
|
|
 You will now solder the first two cells. It is a good idea to use little helpers to
ensure the cells are properly aligned. I have found that an Apple PowerBook 170 and the case of an audio cassette are very well suited for that job, but your mileage may of course vary ;-) You will now solder the first two cells. It is a good idea to use little helpers to
ensure the cells are properly aligned. I have found that an Apple PowerBook 170 and the case of an audio cassette are very well suited for that job, but your mileage may of course vary ;-) |
|
|
 Arrange the two cells as shown in the picture above so that their positive tabs point to the right.
Bend the negative tab of the right battery to the right and bend the positive tab of the left battery in a way that it covers approximately half of the other tab. Solder the two tabs. Make sure to do
this in as little time as possible to reduce heat to a minimum. If you think I am paranoid, you are probably right. The reason I elaborate that much on a simple soldering joint is that if you do it
that way, it wont matter if you melt part of the cells insulating cover and create a short between the cells body and the
soldering tab. Once you are ready, get the other two cells and do the same. You now have two pairs of cells whose names will henceforth be pair A and pair B. Arrange the two cells as shown in the picture above so that their positive tabs point to the right.
Bend the negative tab of the right battery to the right and bend the positive tab of the left battery in a way that it covers approximately half of the other tab. Solder the two tabs. Make sure to do
this in as little time as possible to reduce heat to a minimum. If you think I am paranoid, you are probably right. The reason I elaborate that much on a simple soldering joint is that if you do it
that way, it wont matter if you melt part of the cells insulating cover and create a short between the cells body and the
soldering tab. Once you are ready, get the other two cells and do the same. You now have two pairs of cells whose names will henceforth be pair A and pair B. |
|
|
 Arrange pairs A and B as shown in the picture and glue them together. Make
sure not to glue the bottom side as this is where you will have to put the thermistor. The soldering joints in the middle of each pair should be
arranged in a way that they neither point outwards (which would impede getting the pack back into the case) nor touch the other pair of cells. Arrange pairs A and B as shown in the picture and glue them together. Make
sure not to glue the bottom side as this is where you will have to put the thermistor. The soldering joints in the middle of each pair should be
arranged in a way that they neither point outwards (which would impede getting the pack back into the case) nor touch the other pair of cells. |
|
|
 Flip the pack over
and put some glue where you see it in the picture. It doesnt really matter which kind of glue you use, just make sure you dont apply so much that it exceeds the packs outline as this would
impede reassembly. I usually use glue that is melted with the soldering iron as this kind of glue cures within seconds. Clean the temperature
switch contacts with a sharp knife, tin them from both sides, and solder them to the negative terminal of the top right cell and to the positive terminal of the bottom right cell. Flip the pack over
and put some glue where you see it in the picture. It doesnt really matter which kind of glue you use, just make sure you dont apply so much that it exceeds the packs outline as this would
impede reassembly. I usually use glue that is melted with the soldering iron as this kind of glue cures within seconds. Clean the temperature
switch contacts with a sharp knife, tin them from both sides, and solder them to the negative terminal of the top right cell and to the positive terminal of the bottom right cell. |
|
|
 Solder the red wire to the top left cell and the black wire to the bottom left
cell. Reattach the thermistor. Make sure the thermistors end is very close to the surface of the cells as it is supposed to sense their temperature. You
might want to fix the thermistor wires with a tiny drop of glue. Solder the red wire to the top left cell and the black wire to the bottom left
cell. Reattach the thermistor. Make sure the thermistors end is very close to the surface of the cells as it is supposed to sense their temperature. You
might want to fix the thermistor wires with a tiny drop of glue. |
|
|
 Reattach the cardboard pieces and the s_p_o_t. Provided you have been
patient enough when you removed them, they will still be sticky enough to stay where they belong. Reattach the cardboard pieces and the s_p_o_t. Provided you have been
patient enough when you removed them, they will still be sticky enough to stay where they belong. |
|
|
 If you have new heat shrink coating, now is the time to get it. Use a lighter
to shrink it around the pack, but take your time doing so. You dont want to apply too much heat to the batteries. If you have new heat shrink coating, now is the time to get it. Use a lighter
to shrink it around the pack, but take your time doing so. You dont want to apply too much heat to the batteries.
If, once you are ready, the heat shrink coating looks like what you see in
the picture, grab the rest of it and shove it in the face of the person who sold it to you. |
|
|
 Hopefully you will remember where you put the case. Get it and remove the two
clips. Push the pack in from the right side. Reattach the clips. Get ready for a beer. You are nearly done. Hopefully you will remember where you put the case. Get it and remove the two
clips. Push the pack in from the right side. Reattach the clips. Get ready for a beer. You are nearly done. |
|
|
 Done. Get your voltmeter and measure the voltage across the red and the
black wire. It should be approximately the sum of the four voltages you measured when you started, and it should be positive when the positive
terminal of the voltmeter is connected to the red wire. Now measure the resistance across the two white wires. In my case it was 7.5 kiloOhms, but I
would expect this value to be temperature dependant. As long as as you measure a resistance in the kiloOhms range,
everything is ok. If you are as paranoid as I am, now measure the resistance between the thermistor wires and the black
and red wires. Neither of the white wires may have a connection to the black or red wire. If one does, call it a day and get
the beer I was recently talking about. Always keep in mind that there are more important things than battery packs and start over tomorrow. Done. Get your voltmeter and measure the voltage across the red and the
black wire. It should be approximately the sum of the four voltages you measured when you started, and it should be positive when the positive
terminal of the voltmeter is connected to the red wire. Now measure the resistance across the two white wires. In my case it was 7.5 kiloOhms, but I
would expect this value to be temperature dependant. As long as as you measure a resistance in the kiloOhms range,
everything is ok. If you are as paranoid as I am, now measure the resistance between the thermistor wires and the black
and red wires. Neither of the white wires may have a connection to the black or red wire. If one does, call it a day and get
the beer I was recently talking about. Always keep in mind that there are more important things than battery packs and start over tomorrow. |
|
|
By now you might be wondering where on earth to get AA size NiMH rechargeables with soldering tabs. Until recently you would have found a table with suppliers and their prices here. Meanwhile I have
removed it because it was outdated. If you know of a supplier who sells these cells at a reasonable price, I would be thankful for a tip.
|
|
|
That is it. Not that difficult, was it? However, since I have put up this page a couple of people have asked me if I would do the refurbishing for them. The short answer is Yes, I would.
The slightly more detailed answer is Yes, I would - provided you are aware of the following...
Decent battery cells arent excactly cheap each over here in Germany. Come to think of it, they are far
from that. Moreover, the shipping rates of German postal services border on legalized robbery (for one pack between 8 and 11 EUR depending on where you live and whether you prefer surface or air mail).
This, plus the fact that after spending 3-4 hours on a rebuild I will probably feel better if I have made at least a tiny profit, brings the total price to 35 EUR plus shipping at cost.
In a nutshell
this means that you would get back a pack with 1.75 times the capacity of Apples original pack. But youd have to say goodbye to 35 EUR plus whatever it costs me to ship the pack(s) back at cost plus
whatever it costs you to get them to Germany in the first place.
If all this doesnt deter you, feel free to drop me a line.
Questions? Dead links? Anything unclear? Any syntax or grammatical errors in this description? Feel free to tell me about them. Yes, really. Dont be polite, be helpful. If you arent, how am I supposed to improve my English?
Nothing like that? This page really helped you? Wow! What a perfect reason to sign my guest book...
Ready for the theory? You will find everything you ever wanted to know about rechargeables and a whole lot more here.
If you happen to be interested in reviews of books on batteries, rechargeables and charging concepts, please see my battery books page.
|
|
|
|
|
|