|
 Deutsche Version
dieser Seite Deutsche Version
dieser Seite |
|
|
|
Fixing a display of a MP120 / 130 is not for the faint at heart. Hovever, considering that you made it here, you are probably thinking that you have nothing to lose, so why not give it a try.
Exactly here, by the way, is an excellent place to tell you about my disclaimer. You should be aware that what you are going to do will take
place close to delicate electronic parts that have a tendency to react annoyingly angry when not treated the way they think they deserve. So if while trying to invoke this mysterious mode your pet dies,
your house burns down or your partner (or even worse your Newton) leaves you, it is entirely your fault, not mine. I told you so.
|
|
|
|
Digitizer
|
|
Top glass pane
|
|
LCD Display
|
|
Backlight
|
|
LCD Electronics
|
|
The screen of the Newton 120 / 130 models is built as shown to the left. The digitizer is the thing that senses the pen input, the top glass pane is just a rectangular piece of glass.
Below that is the LCD display, most of which is a glass pane, too. The LCD electronics consist of a flexible printed circuit board that drives the LCD display. The backlight is a
thin foil that is only present in the MessagePad 130 models.
You cant separate the top two layers, and you cant separate the bottom two (three on a
MP130) layers. You can, however, separate the top two layers from the bottom two (or three) layers. |
|
|
Before you continue, get out your vacuum cleaner. Get rid of any dust at and around your workspace. Thoroughly. And if I say thoroughly, I mean thoroughly. Dust particles have this annoying habit of
starting to explore their surroundings when it is most inconvenient. More often than not you will notice them only after the Newton is completely reassembled. Which would leave you with the choice of
either taking it apart again or being driven crazy slowly and methodically.
Just as annoying as a dust particle you cant reach is a fingerprint you cant reach. So Id strongly suggest washing
your hands with soap as soon as your workspace is dust-free.
|
|
|
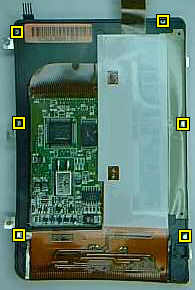 Place the display on a soft cloth. Do not touch either ribbon cable. Spread the six metal
latches marked by the yellow squares upwards and slightly apart. A kitchen knife or a thin screwdriver will make this easier. Place the display on a soft cloth. Do not touch either ribbon cable. Spread the six metal
latches marked by the yellow squares upwards and slightly apart. A kitchen knife or a thin screwdriver will make this easier. |
|
|
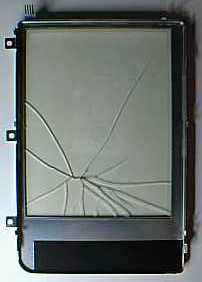 Remove the LCD display. Always hold it at opposite edges, avoid touching its front part. Remove the LCD display. Always hold it at opposite edges, avoid touching its front part.
Before reassembly check twice that there are no dust particles or fingerprints on either the LCD or the inside of the top glass pane. A can of compressed air will come in handy
if a dust particle has made it to where it shouldnt be despite all your precautions.
Reassemble the two parts. Bend the six metal latches inwards. Check the display under
different angles of light to make sure nothing got trapped between the layers.
This is it. You did it. Congratulations. |
|
|
|
|
|